Branduse 3d
realizate prin metoda quilling
Specificatii tehnice lucrare:
Materiale necesare
Pentru executarea unei singure bucati de brandusa din hartie
colorata format A4, sunt necesare urmatoarele materiale:
- hartie normala colorata in format A4
- 1 banda de hartie verde taiata la 0.3 cm – pentru receptaculul
florii
- 1 banda de hartie portocaliu taiata la 0.3 cm - pentru pistil
- 5 benzi de hartie mov taiate la 0.3 cm – pentru petale
- 1 bucata de hartie verde de (5 x 2) cm – pentru codita
- 1 bucata de hartie verde de (5 x 2) cm – pentru frunza
- aracet
- lac transparent pentru unghii
Unelte necesare
- unealta speciala pentru quilling
- sablon pentru forme quilling
- rigla metalica
- foarfeca
- cutter
- o scobitoare
Required
materials
To
execute a single flower of crocus made from colored A4 paper, we need the
following materials:
- colored paper in A4 format
- 1 green
strip, cut at 0,3 cm – for the receptacle of the flower
- 1
orange strip, cut at 0,3 cm - for the pestle
- 5
purple strips, cut at 0,3 cm - for the petals
- 1 piece
of green paper of size (5 x 2 ) cm – for the stem
- 1 piece
of green paper of size (5 x 2 ) cm – for the leaf
- glue
- transparent nail polish
Required
tools
- a special quilling tool
- a template to control the shape of twisted quilling paper
- a metal ruler
- scissors
- a cutter
- a big needle or a toothpick
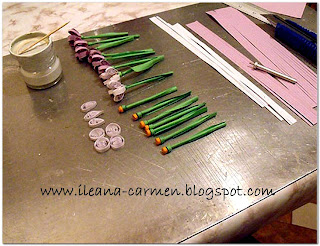
Pasul 1
Hartia verde pentru frunze, dupa ce a fost taiata in forma de
frunza, se rasuceste pe o scobitoare pentru a-i imprima o forma 3d.
Step
1
The
green strips for the leaves, after being cut in the shape of leaves, it is
twisted on a toothpick to print them a 3d shape.
Pasul 2
Hartia de codite se ruleaza strans pe
o scobitoare si se lipeste la capat si apoi se scoate de pe scobitoare.
Step 2
We twisted the green strips for the stems on a
toothpick, then we glued them and we taken out the toothpick.
Pasul 3
Benzile de hartie verde si portocalie
de 0.3 cm se ruleaza pe unealta speciala pentru quilling si apoi se lipesc fara
a da drumul hartiei, in forma lor initiala rotunda.
Se lipesc pe codita frunza si cele
doua benzi rulate pentru receptaculul si pistilul florii.
Step 3
The green and the orange paper strips, of 0,3 cm in
size, are twisted on the special quilling tool and then it sticked, without
releasing the paper, in their original round shape.
On stem it is glued the leaf and the strips
for receptacle of the flower and pestle.
Pasul 4
Petalele se ruleaza pe unealta pentru
quilling, se pun apoi intr-una din formele din sablon, pentru a capata toate
aceiasi marime si apoi se lipesc.
Se indoaie apoi la doua capete opuse
in forma de petala.
Step 4
We twisted the petals on the quilling special tool
and them we put in a same shape of the template, to have the same size for all
the petals, and then we sticked them with paper glue.
Pasul 5
Se da apoi forma finala, se indoaie
numai intr-o parte cu varful degetelor, pentru a capata forma petalei de
brandusa.
Step 5
Them we give them the final shape, we bended only
in one part, with the help of our fingers, to get the crocus petal shape.
Pasul 6
Lipirea petalelor este mai migaloasa
si trebuie facuta cu rabdare, petalele se lipesc pe rand si se asteapta uscarea
unei petale inainte de a lipi alta.
Step 6
Sticking of the petals it is a meticulous operation
and must be done with patience.
Stick one petal once and then stick all of them.
Pasul 7
Dupa asamblarea florii aceasta se lacuieste, pentru a capata
rezistenta, cu lac de unghii transparent sau lac de mobila transparent.
Lacul se da astfel: un strat, se astepta sa se usuce si apoi se
da inca un strat, se asteapta iar sa se usuce si apoi se da ultimul
strat. Se poate lacui modelul si inainte de a-l termina, pe etape. Hartia
se lipeste la fel de bine.
Este mai rapid si mai usor sa se execute odata cate o etapa
pentru numarul de bucati dorit decat toate etapele pentru o singura bucata.
Step
7
At the end we spread the crocuses with transparent
nail polish to increase their durability.
It
is faster and easier to execute one stage for all the number of flowers required but to execute all the steps for a single flower.
Aceste flori de hartie, branduse realizate prin metoda quilling,
pot fi un frumos si original cadou pentru sarbatorile de
1 Marte si de 8 Martie precum si in diferite alte
ocazii.
These
paper flowers, crocuses made by
quilling method,
can
be a beautiful and original gift for celebrations,
1-st
March and 8-th March, as well as various other occasions.
If you are using my tutorial in your projects,
please specify the source of the tutorial.
Thank you.
-
Daca folositi tutorialul meu in proiectele dvs.
va rog sa specificati sursa tutorialului.
Va multumesc.
-
Daca folositi tutorialul meu in proiectele dvs.
va rog sa specificati sursa tutorialului.
Va multumesc.
Crocuses
from Crepe Paper


La o prima privire am crezut ca ai luat si un buchetel de branduse pe langa ghiveci :) Pe cele quilling le-am recunoscut a fi din hartie, dar celelalte par asa de reale!
RăspundețiȘtergereMultumesc Kiddo.
RăspundețiȘtergereLovely!
RăspundețiȘtergereDr Sonia S V
Multumesc.
RăspundețiȘtergere