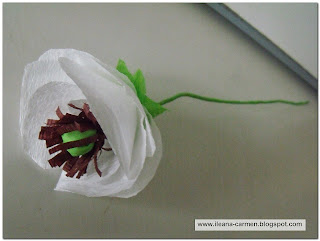
To make a bouquet of crepe paper poppies you need the following materials:
- green, white, orange and brown crepe paper
-white and orange sewing thread
- thin wire about 15 cm in length for each stem in part
- cotton
- glue
Pentru a face un buchet de maci din hartie creponata sunt necesare urmatoarele materiale:
Pentru a face un buchet de maci din hartie creponata sunt necesare urmatoarele materiale:
- hartie creponata de culoare verde, alba, portocalie si maro
- ata papiota de culoare alba si portocalie
- sarma subtire de aproximativ 15 cm lungime pentru fiecare tulpina in parte
- vata sau lana
- aracet
The stages of crepe paper work
Etapele lucrarii
Etapele lucrarii
To achieve the poppy capsule we cut a square of green crepe paper of (5 x 5) cm in dimensions.
Pentru realizarea capsulei de mac se taie un patrat de hartie creponata verde de dimensiuni (5 x 5) cm.
Put a little cotton in the center of the paper square and then twist as shown in the photo above.
In patrat se pune putina vata sau hartie creponata si apoi se rasuceste ca in imaginea de mai sus.
For stamens we cut a strip of crepe paper of (4 x 15) cm in dimensions.
Cut then the strip in fringes of 3 cm in deep on the entire strip of 15 cm in length.
Pentru stamine, se taie o banda de hartie creponata de dimensiuni (4 x 15) cm.
Se taie apoi banda in franjuri de 3 cm adancime pe toata lungimea de 15 cm.
Se taie apoi banda in franjuri de 3 cm adancime pe toata lungimea de 15 cm.
Then twist tightly the strips and the poppy capsules as is shown in photo above.
Apoi benzile si capsulele de mac se rasucesc strans impreuna ca in imaginea de mai sus.
Bind, at one end of the wire, all the components tightly with a wire.
Legati bine apoi la un capat totul cu un fir de sarma.
Cut 8 petals for each poppy, from squares of (5 x 5 ) cm in dimensions.
Taiati cate 8 petale pentru fiecare floare in parte, din patrate de dimensiuni (5 x 5) cm.
Twist all the petals over the wire and tied them with thread or stick them with glue.
Se rasucesc petalele peste sarma si apoi se leaga cu ata sau se lipesc cu aracet.
We cut a strip of green crepe paper of (1 x 25) cm in dimensions and then wrap each stem
with crepe paper and at the lower part of the wire we stick it with glue to achieve the stem of the flower.
Taiati o fasie de hartie creponata verde de dimensiuni (1 x 25) cm si inveliti fiecare sarma cu hartia creponata si la capatul de jos lipiti cu lipici pentru a realiza tulpina florii de mac.
Se taie apoi o forma, dintr-un patrat de hartie creponata de culoare verde de dimensiuni
(4 x 4) cm, o forma ca in figura de mai sus.
(4 x 4) cm, o forma ca in figura de mai sus.
Aceasta forma se lipeste cu putin aracet de petalele florii.

A Poppy Flower is around 20 cm in length.
Dimensiunile unei flori de mac, cu tulpina cu tot, sunt de aproximativ 20
cm.
This
TUTORIAL
was published on
Totally Tutorials
on page
Tutorial - How to Make Crepe Paper Poppies


TUTORIAL
was published on
Totally Tutorials
on page
Tutorial - How to Make Crepe Paper Poppies


If you are using my tutorial in your
projects,
please specify the source of the
tutorial.
Thank you.
-
Daca folositi tutorialul meu in proiectele dvs.
-
Daca folositi tutorialul meu in proiectele dvs.
va rog sa specificati pe
blogul dvs. sursa tutorialului.
Va multumesc.
Va multumesc.
You
might also like:


Superbi maci! Multumiri pentru tutorial!
RăspundețiȘtergereMultumesc Kiddo.
RăspundețiȘtergereSunt superbi maci tai! Felicitari!
RăspundețiȘtergereAbia astept sa ii incerc.
Multumesc frumos Andreea.
RăspundețiȘtergereSunt foarte reusiti, mai ales cei rosii.Merci pentru tutorial:D
RăspundețiȘtergereMultumesc Oana.
RăspundețiȘtergereYour poppies are lovely! Thanks for visiting All Things Paper, by the way. :)
RăspundețiȘtergereThank you Ann.
RăspundețiȘtergereMultumesc pentru vizita pe blogul meu. Mi-ai starnit curiozitatea si asa ca am intors vizita. Sunt impresionata. Foarte frumoase lucrari. iar macii, pe langa floarea soarelui, sunt florile mele preferate. Cu siguranta am sa incerc sa imi fac cativa, conform acestui tutorial. poate acum, de Pasti, fiind mai liniste, ca sa ma relaxez putin.
RăspundețiȘtergereSa ai parte de sarbatori linistite
Mulţumesc pentru instrucţiuni şi idee. Iată ce mi-a ieşit mie:
RăspundețiȘtergerehttp://i781.photobucket.com/albums/yy91/genairoh/origami/3147.jpg
Numai bine!
Multumesc frumos.
ȘtergereVery pretty and very simple, thanks so much for this tutorial...I really love
RăspundețiȘtergerepoppies!♥
Thank you.
Ștergerethank for your tutorial
RăspundețiȘtergerehave a good day
Josefina
tijerasycuchara.wordpress.com
Thank you.
ȘtergereSimply desire to say your article is as amazing. The clearness in your publish is simply spectacular and that i could assume you are knowledgeable on this subject.
RăspundețiȘtergereFine with your permission let me to grasp your RSS feed
to stay updated with approaching post. Thank you one million and please carry on the rewarding work.